Wix Integration
Biskoui is a Swiss solution dedicated to managing third-party services and cookies that aims to make your website compliant with data protection regulations, such as nLPD (new Data Protection Act) in Switzerland and GDPR (General Data Protection Regulation) in Europe.
Here's how to install the Biskoui consent banner on your website built on the Wix CMS.
This Custom Code installation displays the Biskoui banner and controls scripts managed by Biskoui. To also control native Wix Analytics, complete the optional Wix Analytics synchronization section.
Prerequisites
Before you start, visit admin.biskoui.ch and create an account if you haven't already. Biskoui is available in a free version.
Installation
Step 1: Configure Your Biskoui Account
Once your account is created:
-
Create your domain
-
Configure your banner
-
Add your services subject to consent (e.g., Google Analytics, YouTube, etc.)
-
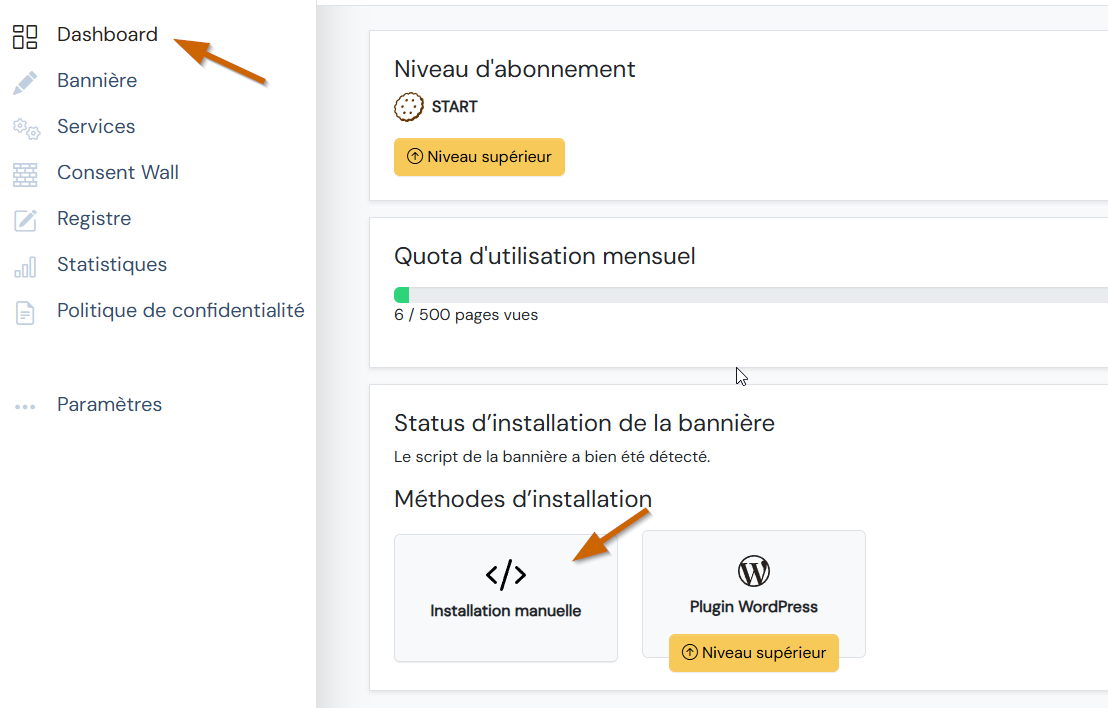
Go to the Dashboard tab and click on Manual Installation
-
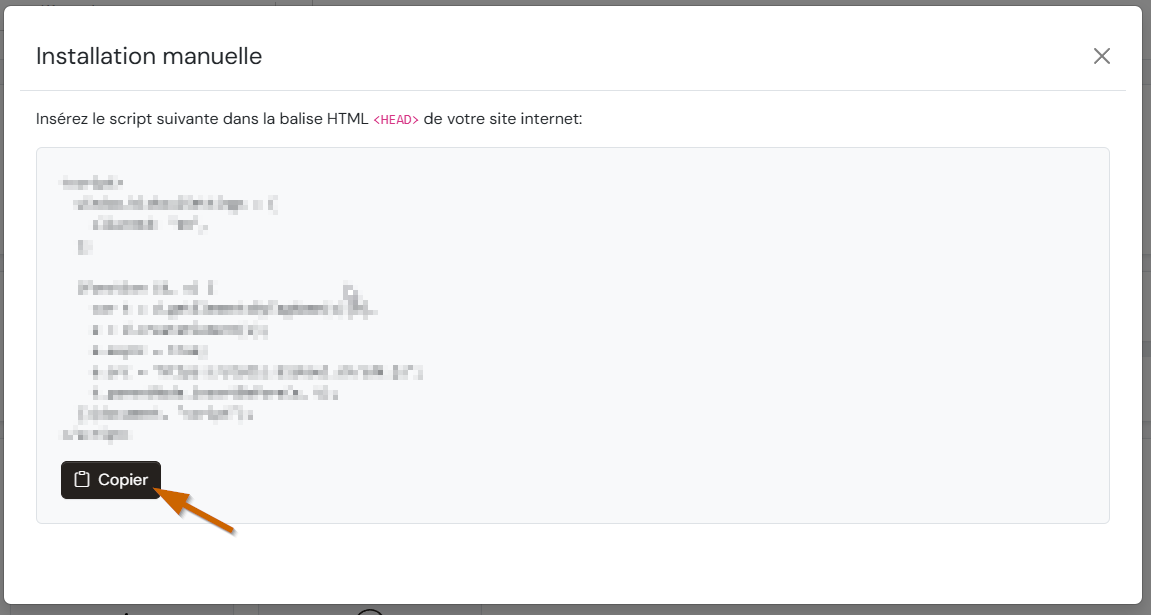
Click the Copy button to put the installation script in your clipboard
Step 2: Add the Banner to Your Wix Site
-
Log in to your Wix account
-
Open your site editor (from the Wix dashboard)
-
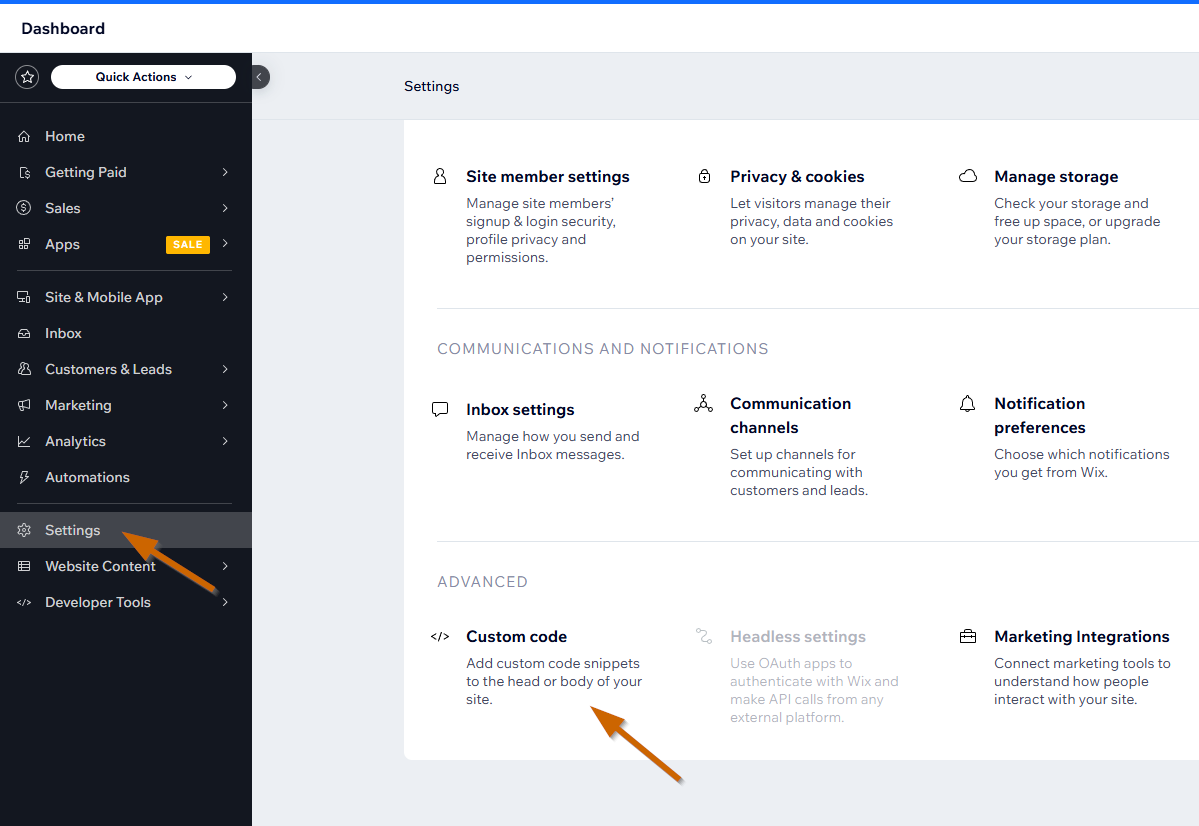
Go to Settings → Business Info
-
Scroll down and click on Add Custom Code
-
Click the Add Custom Code button
-
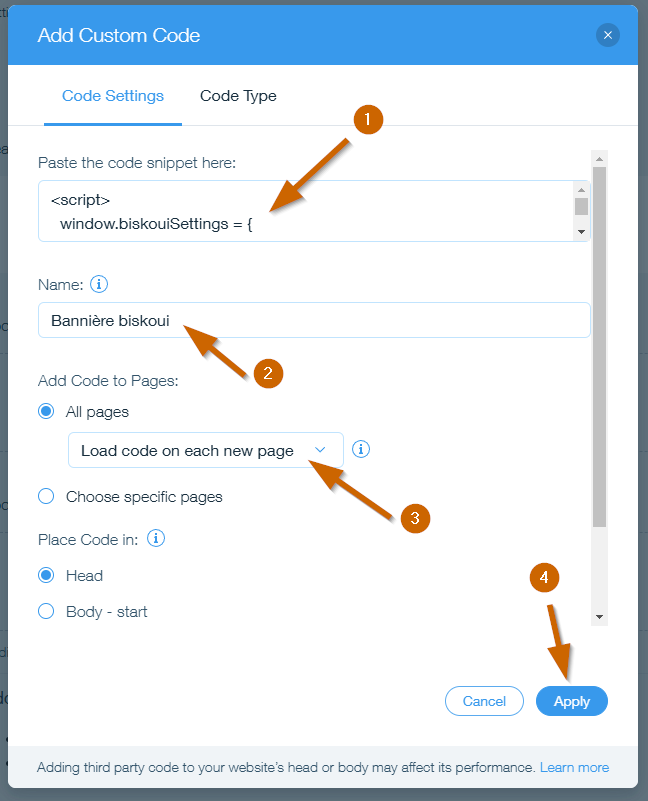
In the new window that appears, configure as follows:
- Paste the code previously copied from Biskoui
- Enter the name "Biskoui Banner" to easily understand the purpose of the code
- Select the option Load code on each new page
- Click Apply at the bottom right
- Special case: If your site is connected to multiple domains, an additional list will allow you to choose the domain on which the script will be installed. Make sure to choose your site's primary domain
Verification and Testing
Visit your website from a new browser tab. When the page loads, the Biskoui consent banner should now appear.
Optional: Wix Analytics synchronization
Native Wix Analytics is managed by Wix rather than loaded from the Biskoui dashboard. Complete this section only if you want the Biskoui Analytics choice to control native Wix Analytics.
When a visitor changes their Analytics choice, Biskoui updates the Wix consent policy and refreshes the page once. Wix applies consent-policy changes after a refresh.
This optional integration uses window.consentPolicyManager, which Wix exposes
on published sites but does not document as a public Custom Code interface. A
future Wix update may change or remove it and stop native Wix Analytics
synchronization from working. By using this optional integration, you accept
that compatibility risk. The standard Biskoui installation does not depend on
this interface.
Native Wix Analytics follows Wix's consent policy. It does not use Google Consent Mode. If your site also uses Google Analytics, Google Tag Manager, or Google Ads, configure those services separately in Biskoui.
This procedure requires a Wix Editor or Wix Studio site with Velo support. You must have permission to edit Velo backend code, page code, and Custom Code.
Step 1: Configure Wix Analytics in Biskoui
- Open the domain in the Biskoui dashboard.
- Add the generic Analytics service to the banner.
- Set its integration mode to Automated.
- Copy the domain ID from the manual installation script.
If the site also uses Wix components in the Functional or Advertising categories, you can add the corresponding generic Biskoui services in Automated mode:
| Biskoui service | Wix category |
|---|---|
| Preferences | Functional |
| Analytics | Analytics |
| Marketing | Advertising |
Step 2: Set the Wix default consent policy
Wix allows Analytics by default when no consent solution has changed the site policy. Set a restrictive default before enabling synchronization so Wix Analytics does not start while Biskoui waits for a choice.
You only need to run this setup once.
- Enable Dev Mode in Wix Editor or Wix Studio.
- Open the code panel.
- Under Backend, create a web module named
biskouiConsentSetup.web.js. - Replace its contents with:
import { siteProperties } from "wix-business-tools.v2";
import { elevate } from "wix-auth";
import { Permissions, webMethod } from "wix-web-module";

const updateConsentPolicy = elevate(siteProperties.updateConsentPolicy);

export const configureBiskouiConsentDefault = webMethod(
  Permissions.Admin,
  async () => {
    await updateConsentPolicy({
      essential: true,
      functional: false,
      analytics: false,
      advertising: false,
      dataToThirdParty: false,
    });
  }
);
- Choose one site page and add this import to its page code:
import { configureBiskouiConsentDefault } from "backend/biskouiConsentSetup.web";
- Call the function from that page's
$w.onReady()handler:
$w.onReady(async function () {
  try {
    await configureBiskouiConsentDefault();
    console.log("Biskoui: Wix default consent policy configured");
  } catch (error) {
    console.error("Biskoui: could not configure Wix consent policy", error);
  }
});
If the page already has a $w.onReady() handler, add only the try block inside it.
- Publish the site.
- While signed in to Wix as the site owner or a collaborator, open that published page.
- Open the browser console and confirm that it contains
Biskoui: Wix default consent policy configured. - Remove the temporary import and function call from the page code.
- Delete
biskouiConsentSetup.web.jsand publish the site again.
Removing the setup code does not undo the policy. Wix keeps the new default until another consent solution changes it.
Step 3: Replace the standard Biskoui snippet
Remove the Biskoui Custom Code entry installed earlier. Replace it with the snippet below so the Wix bridge is available before Biskoui loads.
Replace REPLACE_WITH_YOUR_BISKOUI_DOMAIN_ID with the domain ID copied from Biskoui.
<script>
  (function () {
    var clientId = "REPLACE_WITH_YOUR_BISKOUI_DOMAIN_ID";
    var timeoutAt = Date.now() + 15000;

    function loadBiskoui() {
      var wixConsent = window.consentPolicyManager;

      if (
        !wixConsent ||
        typeof wixConsent.getCurrentConsentPolicy !== "function" ||
        typeof wixConsent.setConsentPolicy !== "function"
      ) {
        if (Date.now() < timeoutAt) {
          window.setTimeout(loadBiskoui, 50);
          return;
        }

        console.error(
          "Biskoui: the Wix consent policy manager is unavailable"
        );
        return;
      }

      window.biskouiWixConsentBridge = {
        getCurrentConsentPolicy: async function () {
          var details = await wixConsent.getCurrentConsentPolicy();
          return details.policy;
        },

        setConsentPolicy: async function (policy) {
          await wixConsent.setConsentPolicy(policy);
        },
      };

      window.biskouiSettings = {
        clientId: clientId,
      };

      if (window.biskoui || document.querySelector("script[data-biskoui-sdk]")) {
        return;
      }

      var script = document.createElement("script");
      script.async = true;
      script.src = "https://static.biskoui.ch/sdk.js";
      script.setAttribute("data-biskoui-sdk", "true");
      document.head.appendChild(script);
    }

    loadBiskoui();
  })();
</script>
Configure this Custom Code entry as follows:
- Name:
Biskoui Wix consent integration - Placement: Head
- Pages: All pages
- Loading: Load on each new page
- Code type: Essential
Step 4: Disable other consent banners
Disable Usercentrics for Wix and remove any other consent-management script after the Biskoui synchronization snippet is active. Two consent banners can overwrite each other's Wix consent policy.
Step 5: Verify Wix Analytics synchronization
Run these checks on the published site, not in Wix Preview:
-
Open the site in a new private browser window and confirm that Biskoui appears.
-
Before making a choice, run the following in the browser console:
await window.consentPolicyManager.getCurrentConsentPolicy()The returned policy must contain
analytics: false. Wix Analytics must not send browser analytics requests. -
Accept Analytics in Biskoui. The page should refresh once. Run the policy check again and confirm that it contains
analytics: true. -
Reject Analytics in Biskoui. The page should refresh once. Run the policy check again and confirm that it contains
analytics: false. -
Reload once more and confirm that Biskoui restores the saved choice without another refresh.
If the browser console reports Biskoui: the Wix consent policy manager is unavailable, restore the standard Biskoui snippet. The banner and Biskoui-managed services will continue to work without native Wix Analytics synchronization.
Removing Wix Analytics synchronization
To stop synchronizing Wix Analytics while keeping the standard Biskoui integration, replace the synchronization snippet with the original Biskoui installation script.
Enable another Wix consent solution before removing synchronization. If you intend to run without a Wix consent solution, repeat Step 2 with all five policy fields set to true before removing the synchronization snippet. Review the laws that apply to the site before restoring an allow-all Wix policy.
Need Help?
Our support team is available at support@biskoui.ch